How Does Invisalign Fix Overbite Step by Step for Kids
January 17, 2026
How Does Invisalign Fix Overbite Step by Step for Kids
Every parent faces decisions about their child’s health that feel both urgent and confusing, especially when an overbite is discovered. Addressing this dental issue early offers your child the best chance for a confident smile and strong bite. With modern solutions like customized Invisalign treatment plans created through advanced 3D imaging and expert evaluation, parents in Langley have access to trusted orthodontic care designed for growing children. Discover a detailed, step-by-step guide to help you navigate each stage of the Invisalign process for your child.
Table of Contents
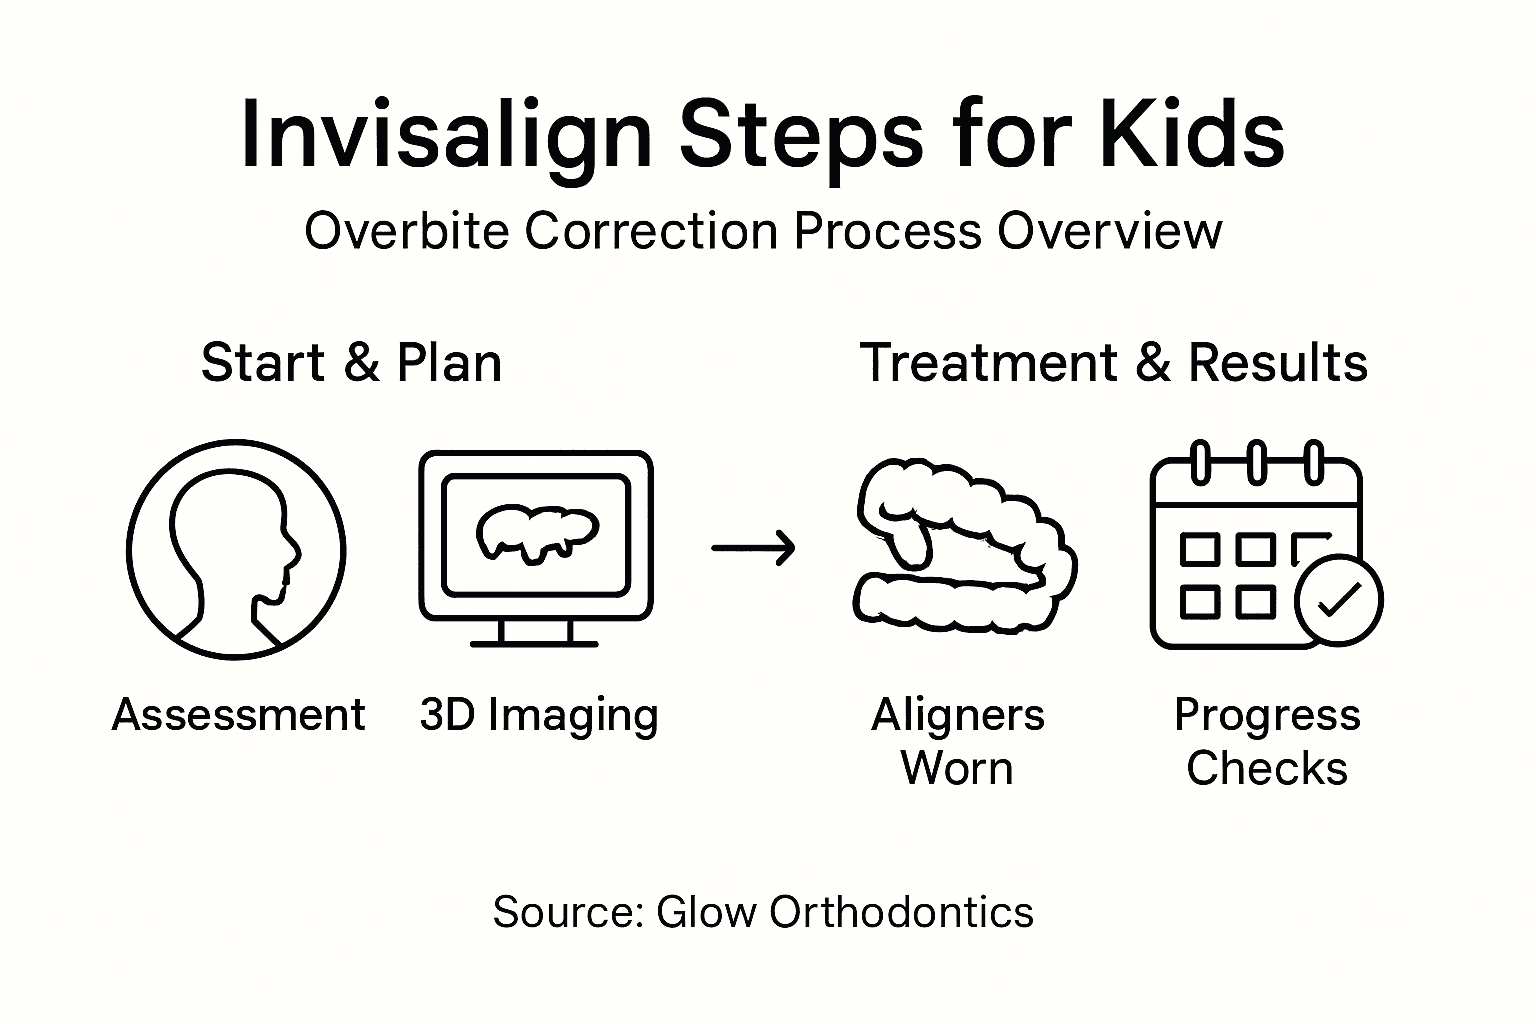
- Step 1: Schedule An Orthodontic Assessment
- Step 2: Personalize The Invisalign Treatment Plan
- Step 3: Start Wearing Custom Invisalign Aligners
- Step 4: Monitor Progress And Adjust Aligners
- Step 5: Verify Overbite Correction And Maintain Results
Quick Summary
| Key Insight | Explanation |
|---|---|
| 1. Schedule an Early Assessment | Schedule your child’s first orthodontic check-up before age 7 to catch potential dental issues early. |
| 2. Personalize the Treatment Plan | Use advanced 3D imaging and custom aligners to create a personalized Invisalign treatment plan tailored to your child’s needs. |
| 3. Monitor Treatment Progress | Regular follow-up visits ensure that treatment stays on course and allows for adjustments to optimize results. |
| 4. Verify Correction Success | A final assessment using 3D scans confirms the overbite correction and helps develop a retention strategy to maintain results. |
| 5. Discuss Retention Strategies | Post-treatment, recommend custom retainers and establish a maintenance schedule to prevent teeth from shifting back. |
Step 1: Schedule an orthodontic assessment
Scheduling an initial orthodontic check-up before age 7 can help catch and address potential dental issues early. During this first assessment, our experienced orthodontists will evaluate your child’s teeth alignment, jaw development, and potential overbite concerns.
To schedule the assessment, contact Glow Orthodontics and provide basic information about your child. Our friendly staff will help you select a convenient time that works with your schedule. The initial consultation typically takes about 45 minutes and includes a comprehensive oral examination, digital x-rays, and a personalized treatment discussion with our orthodontic specialists.
During the assessment, our team will determine whether Invisalign is the right solution for your child’s specific overbite condition. We will review treatment options, potential timelines, and answer any questions you might have about the process.
Pro tip: Bring your child’s dental records and insurance information to streamline the initial assessment process.
Step 2: Personalize the Invisalign treatment plan
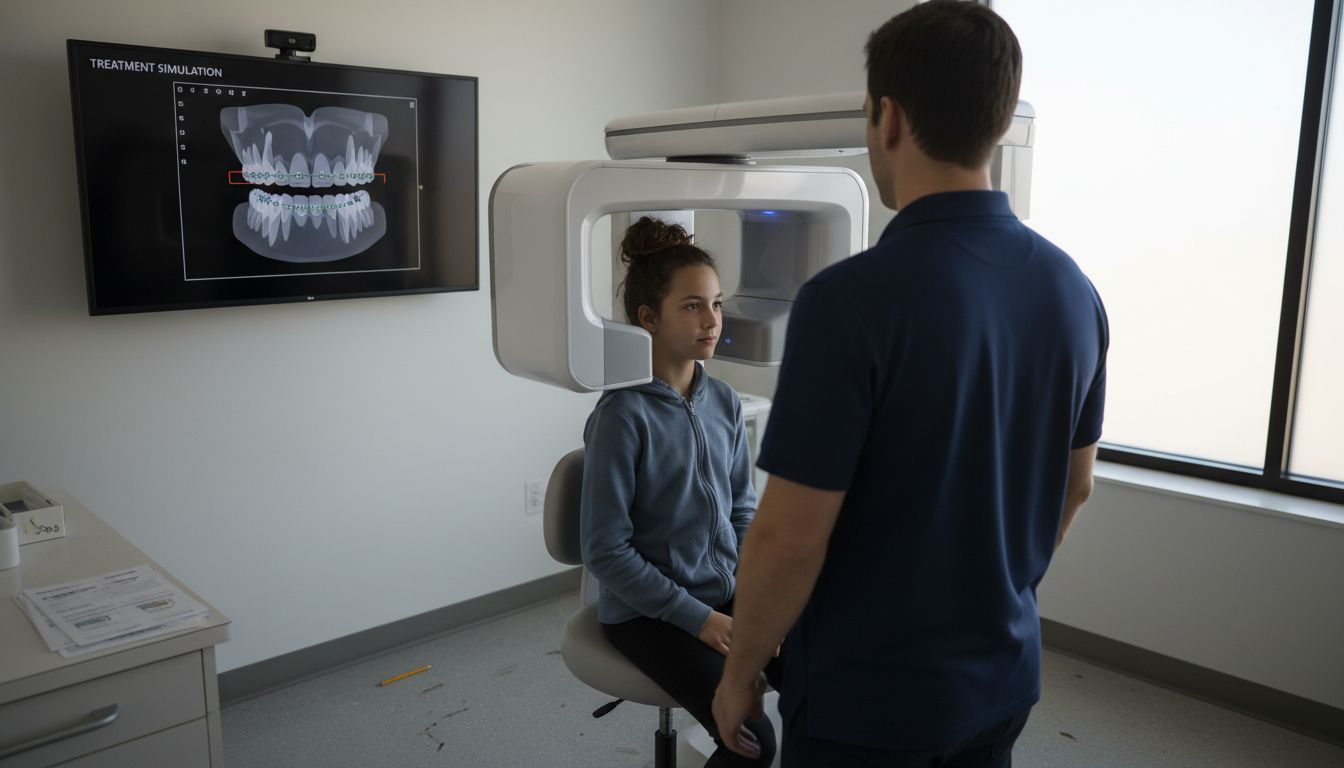
Creating a personalized Invisalign treatment plan involves detailed 3D imaging and custom aligner design to address your child’s specific overbite condition. Our orthodontists will use advanced ClinCheck software to generate a precise digital treatment roadmap that simulates how your child’s teeth will gradually move into proper alignment.
The customization process begins with comprehensive measurements of your child’s dental anatomy. We will strategically plan the placement of attachments, buttons, and potential elastic bands to guide teeth into their optimal positions. These small, tooth-colored components work like handles to help the aligners apply targeted pressure and encourage specific tooth movements needed to correct the overbite.
Through treatment predictions generated by specialized software, we can preview the expected tooth and jaw transformations before the actual treatment begins. This allows us to make precise adjustments and set realistic expectations for your child’s orthodontic journey.
Pro tip: Ask to view the digital treatment simulation during your consultation to better understand how the Invisalign aligners will transform your child’s smile.
Step 3: Start wearing custom Invisalign aligners
Beginning your Invisalign treatment involves wearing custom-made clear plastic aligners designed specifically to address your child’s overbite. Each set of aligners is precisely engineered to apply gentle pressure and gradually shift teeth into their correct positions.
Your child will typically wear each set of aligners for approximately two weeks before transitioning to the next series in the treatment sequence. The aligners should be worn 20 to 22 hours daily, removing them only for eating, drinking, brushing, and flossing. Small tooth-colored attachments strategically placed on specific teeth will help guide the aligners and enhance their effectiveness in correcting the overbite.
The dual-arch Invisalign system with SmartForce attachments allows for precise tooth movement, gradually intrusion or extruding teeth to modify their positioning. This approach ensures a controlled and predictable progression toward correcting your child’s dental alignment.
Pro tip: Create a simple sticker chart or digital tracking system to help your child stay motivated and consistently wear their aligners as recommended.
Step 4: Monitor progress and adjust aligners
Tracking your child’s Invisalign treatment involves regular follow-up visits to evaluate alignment changes. Our orthodontists will conduct comprehensive dental scans to compare the actual tooth movements against the original treatment plan and make necessary adjustments to ensure optimal results.
During these monitoring appointments, we will carefully assess how your child’s teeth are responding to the aligners. Some planned tooth movements might not progress exactly as initially predicted, which is why periodic evaluations are crucial. If minor discrepancies are detected, we can create additional aligner sets or make precise modifications to keep the treatment on track.
The continuous tracking of vertical tooth movements and bite changes allows us to refine the treatment strategy dynamically. This approach ensures that we can address any subtle shifts or unexpected developments in your child’s orthodontic journey, maintaining the ultimate goal of correcting the overbite effectively.
Pro tip: Maintain a digital photo log of your child’s smile progression to help visualize the gradual improvements and stay motivated throughout the treatment.
Step 5: Verify overbite correction and maintain results
Completing your Invisalign treatment involves a comprehensive clinical verification process using 3D dental scans. Our orthodontists will carefully compare the final tooth positioning against the initial treatment goals to confirm that the overbite has been successfully corrected.
The verification stage includes detailed measurements and visual assessments to ensure your child’s teeth have achieved optimal alignment. After confirming the correction, we will recommend a personalized retention strategy to prevent teeth from shifting back to their original positions. This typically involves custom-fitted retainers that your child will wear according to a specific schedule recommended by our orthodontic team.
Maintaining the corrected bite requires ongoing monitoring through regular dental visits. These checkups allow us to track the long-term stability of the treatment and make any necessary adjustments to preserve the beautiful, healthy smile we have worked together to achieve.
Pro tip: Create a consistent evening routine for retainer wear and cleaning to help your child develop good oral hygiene habits.
Below is a comparison of Invisalign versus traditional braces in correcting a child’s overbite:
| Factor | Invisalign | Traditional Braces |
|---|---|---|
| Visibility | Nearly invisible | Highly visible |
| Comfort | Smooth plastic aligners | Metal brackets/wires |
| Eating Restrictions | Removable for meals | Must avoid sticky/hard foods |
| Cleaning | Remove for brushing/flossing | Brush around brackets |
| Appointment Type | Digital scan monitoring | Manual wire adjustments |
Here’s a summary of key steps in the Invisalign process for children:
| Step | Main Purpose | Tools/Techniques | Monitoring Frequency |
|---|---|---|---|
| Initial Assessment | Evaluate dental structure | Oral exam, x-rays | Once, at start |
| Treatment Planning | Customize correction approach | 3D imaging, ClinCheck software | As needed before treatment |
| Wearing Aligners | Gradually shift teeth | Custom aligners, SmartForce attachments | Daily at home |
| Progress Checks | Ensure alignment is on track | Dental scans, adjustments | Every 6-8 weeks |
| Retention Phase | Maintain corrected bite | Custom retainers | Ongoing yearly visits |
Take the First Step Toward Fixing Your Child’s Overbite with Invisalign at Glow Orthodontics
Correcting an overbite in children can feel overwhelming. You want a solution that is effective, comfortable, and tailored specifically to your child’s needs. This detailed step-by-step guide shows how Invisalign uses precise digital treatment plans, custom aligners, and ongoing monitoring to achieve lasting results. Key challenges like ensuring a perfect fit, monitoring progress, and maintaining the corrected bite are addressed through advanced technology and expert care.
At Glow Orthodontics, we understand how important it is to provide gentle, personalized treatment in a welcoming environment. Our team specializes in Invisalign for kids, combining professional expertise with a commitment to your child’s comfort and confidence. Let us help you turn those early assessments into a glowing smile that lasts.

Discover how our friendly team can guide your family through every phase—from the initial consultation to retention strategies—with clear communication and technology-driven precision. Visit Glow Orthodontics to schedule your child’s orthodontic assessment today and start the journey toward a healthier bite. Learning more about our personalized treatment options and reading patient testimonials can give you confidence in choosing the right care. Act now to secure an appointment because early intervention leads to the best results.
Frequently Asked Questions
How do I schedule my child’s initial Invisalign assessment?
To schedule your child’s initial assessment, contact Glow Orthodontics and provide basic information about your child. The assessment will help identify potential dental issues early and takes about 45 minutes, including a comprehensive examination.
What happens during the Invisalign treatment planning process?
During the treatment planning process, orthodontists create a personalized plan using detailed 3D imaging and software to design custom aligners. This ensures that each aligner is tailored to address your child’s specific overbite condition.
How long will my child need to wear each set of Invisalign aligners?
Your child will need to wear each set of Invisalign aligners for approximately two weeks before switching to the next series. Ensure that they wear the aligners for 20 to 22 hours daily for maximum effectiveness in correcting the overbite.
How can I monitor my child’s progress during the Invisalign treatment?
You can monitor your child’s progress by attending regular follow-up visits, typically every 6 to 8 weeks. At these appointments, the orthodontist will evaluate alignment changes and make any necessary adjustments to keep the treatment on track.
What should I do after completing the Invisalign treatment?
After completing the Invisalign treatment, your child will need to wear custom retainers as recommended by the orthodontist to maintain their corrected bite. Schedule regular dental visits to monitor the stability of the results and keep your child’s smile healthy.
How can I motivate my child to consistently wear their aligners?
To motivate your child to consistently wear their aligners, consider creating a fun sticker chart or digital tracking system. This can help them visualize their progress and stay engaged throughout their orthodontic journey.