How to Clean Aligners Effectively for Best Results
September 18, 2025
How to Clean Aligners Effectively for Best Results
Keeping your aligners clean is more than just a daily routine. It can actually impact your entire orthodontic treatment. Most people grab any old toothbrush or soap, expecting a quick rinse will do the job. But surprisingly, using the wrong supplies or skipping steps can leave behind bacteria you cannot see. In fact, research shows that improper cleaning lets invisible plaque build up, and even a hot water rinse can warp your aligners before you notice. The secret? A few simple methods and the right tools can make your aligners last longer and keep your smile on track.
Table of Contents
- Step 1: Gather Your Cleaning Supplies
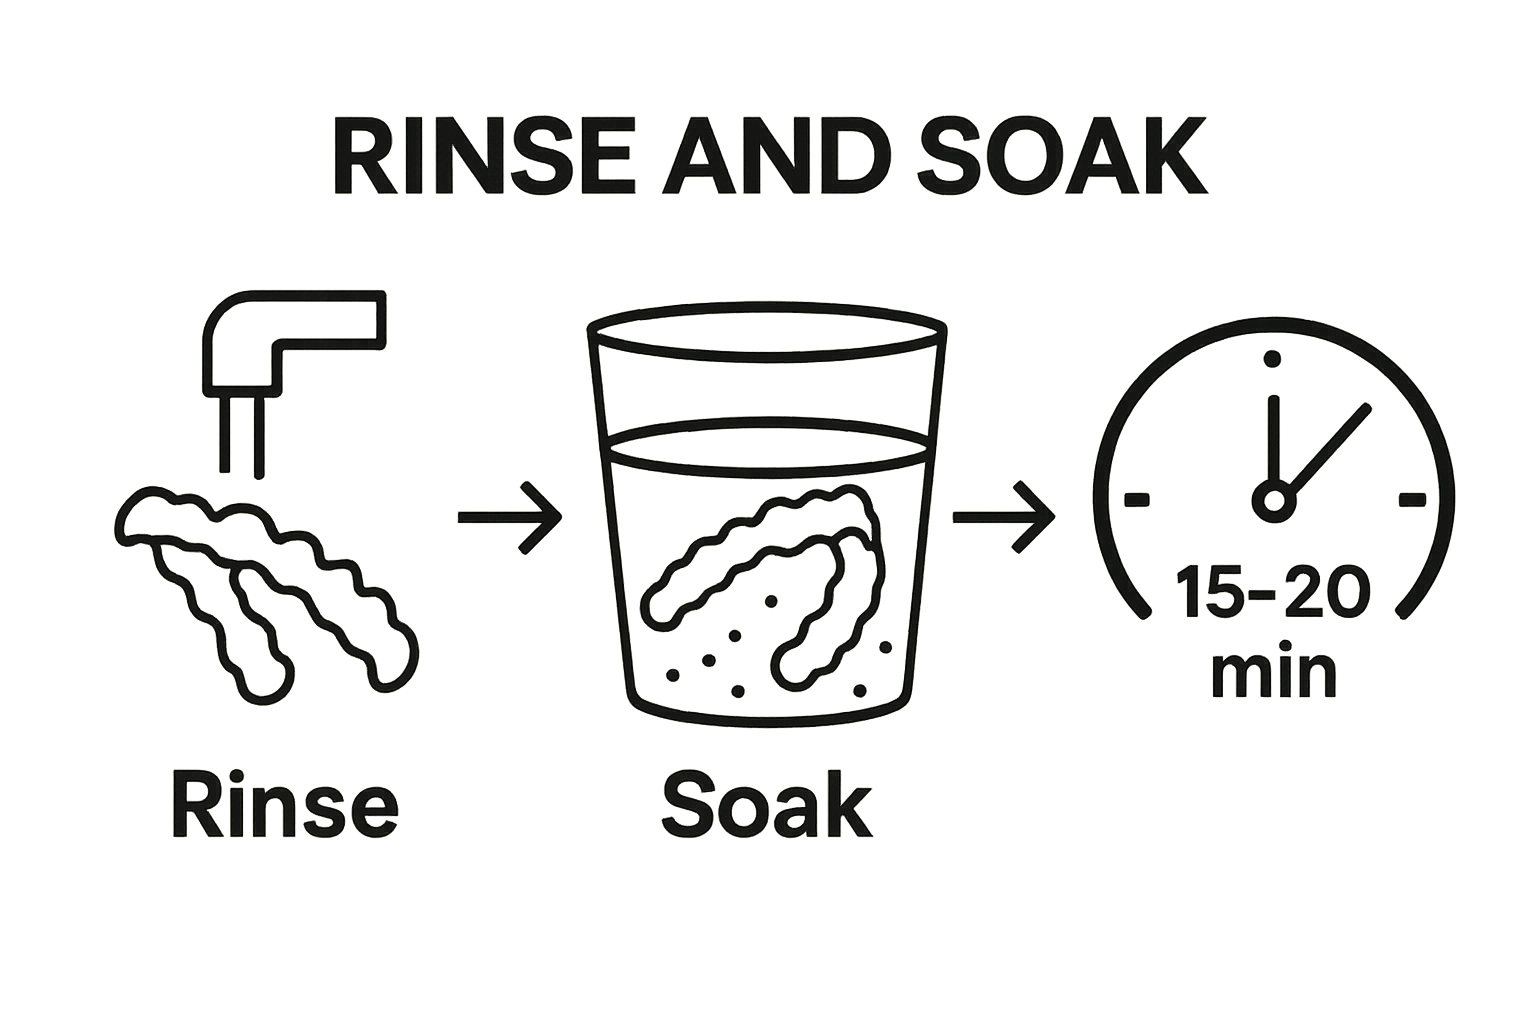
- Step 2: Rinse Aligners Thoroughly
- Step 3: Create A Cleaning Solution
- Step 4: Soak Aligners In The Solution
- Step 5: Brush Aligners Gently
- Step 6: Rinse And Store Aligners Properly
Quick Summary
| Key Point | Explanation |
|---|---|
| 1. Gather Proper Cleaning Supplies | Use lukewarm water, soft brush, clear soap, and crystals. Avoid hot water and harsh chemicals to maintain aligners’ integrity. |
| 2. Rinse Aligners with Lukewarm Water | Thoroughly rinse aligners to remove debris, focusing on edges where buildup occurs. Ensure water is not too hot or cold. |
| 3. Create a Mild Cleaning Solution | Mix clear antibacterial soap with lukewarm water for an effective, gentle cleaning solution without damaging aligners. |
| 4. Soak Aligners for Effective Cleaning | Soak aligners in the cleaning solution for 15-20 minutes to eliminate bacteria and debris while preserving material integrity. |
| 5. Store Aligners in a Clean Case | Use a dedicated, ventilated, hard case to protect your aligners from bacteria and moisture when not in use. |
Step 1: Gather Your Cleaning Supplies
Cleaning your aligners effectively starts with assembling the right tools and understanding the essential requirements for maintaining their pristine condition. Proper preparation ensures that you can clean your aligners thoroughly without causing damage or compromising their transparency.
To begin, you will need a few specific items that are gentle yet effective for aligner maintenance. The most recommended cleaning supplies include lukewarm water, a soft-bristled toothbrush, clear antibacterial soap, and specialized aligner cleaning crystals. Avoid using hot water, as extreme temperatures can warp the plastic material and potentially reshape your custom-fitted aligners.
According to research from Dentaly, selecting the right cleaning agents is crucial. Avoid harsh chemicals like colored mouthwash, bleach, or abrasive toothpaste, which can scratch or discolor your aligners. Instead, opt for mild, unscented antibacterial soap that will effectively remove bacteria without causing surface damage.
Your cleaning kit should include:
- Soft-bristled toothbrush (dedicated exclusively for aligner cleaning)
- Mild, clear antibacterial soap
- Lukewarm water
- Aligner cleaning crystals or tablets
- Clean, lint-free towel
Before you begin the cleaning process, ensure your hands are thoroughly washed to prevent transferring additional bacteria onto the aligners. A dedicated clean workspace with good lighting will help you maintain proper hygiene and inspect your aligners for any potential issues during cleaning.
By gathering these supplies and understanding their proper use, you are setting the foundation for maintaining clean, hygienic aligners that remain transparent and effective throughout your orthodontic treatment.
Here is a summary table of recommended tools and supplies for effective aligner cleaning, including their purpose and key considerations to help you assemble your kit confidently.
| Item | Purpose | Special Considerations |
|---|---|---|
| Soft-bristled toothbrush | Gently scrub aligners without scratching surface | Dedicate a brush just for aligner cleaning |
| Mild, clear antibacterial soap | Kills bacteria and removes debris | Use unscented, clear soap—avoid harsh chemicals |
| Lukewarm water | Rinse and create safe cleaning solution | Never use hot water to prevent warping |
| Aligner cleaning crystals | Deep cleans and removes odors | Use as directed by manufacturer |
| Clean, lint-free towel | Dry aligners after cleaning | Prevents lint transfer onto aligners |
| Dedicated clean container | Holds solution for soaking aligners | Wash container frequently |
Step 2: Rinse Aligners Thoroughly
Rinsing your aligners is a critical step in maintaining their cleanliness and preventing bacterial buildup. This process goes beyond a simple quick wash and requires careful attention to ensure your aligners remain hygienic and transparent throughout your orthodontic treatment.
Lukewarm water is your primary tool for initial rinsing, and temperature matters significantly. Cold water will not effectively remove debris, while hot water can potentially warp the plastic material of your aligners. Aim for water that is comfortably warm but not hot enough to cause discomfort if you were to touch it.
Begin by holding your aligners under a gentle stream of lukewarm water, rotating them to ensure complete coverage. Use your clean hands to carefully remove any visible food particles or debris. Pay special attention to the edges and attachment points, where plaque and bacteria tend to accumulate. Gently run your fingers along these areas while rinsing to dislodge any stuck particles.
According to research from dental experts, consistent and thorough rinsing is essential for preventing potential oral health complications during orthodontic treatment. The goal is not just surface cleaning but comprehensive removal of microscopic debris that can harbor harmful bacteria.
Verification checklist for proper rinsing:
- Water runs clear without any visible food particles
- Aligners feel smooth when gently touched
- No cloudy or opaque areas remain after rinsing
- Edges and attachment points appear clean
If you notice persistent staining or buildup that cannot be removed through rinsing, do not resort to aggressive scrubbing. Instead, set these aligners aside and consult your orthodontist about specialized cleaning techniques or potential replacement.
Remember that rinsing is just the initial step in a comprehensive aligner cleaning routine. This process prepares your aligners for more detailed cleaning methods that will follow, ensuring they remain clear, odor-free, and effective throughout your treatment journey.
This step-by-step summary table gives a quick overview of each main stage in the aligner cleaning process, along with the goal and estimated time needed for each.
| Step | Goal | Estimated Time |
|---|---|---|
| 1. Gather Cleaning Supplies | Ensure correct tools are ready | 2-3 minutes |
| 2. Rinse Aligners | Remove loose debris and prep for cleaning | 1 minute |
| 3. Create Cleaning Solution | Prepare a safe, gentle mixture | 1-2 minutes |
| 4. Soak Aligners | Deep clean and sanitize aligners | 15-20 minutes |
| 5. Brush Aligners Gently | Eliminate remaining debris without scratching | 2-3 minutes |
| 6. Rinse & Store Properly | Final clean and hygienic storage | 2 minutes |
Step 3: Create a Cleaning Solution
Creating the right cleaning solution is a delicate process that requires precision and careful selection of ingredients to maintain your aligners’ integrity and cleanliness. The goal is to develop a gentle yet effective cleaning mixture that removes bacteria and debris without causing damage to the aligner material.
Avoid using harsh chemicals or colored solutions that could potentially stain or degrade your aligners. Instead, focus on creating a mild, antibacterial solution using ingredients that are safe and effective. Clear, unscented antibacterial soap mixed with lukewarm water serves as an excellent base for your cleaning solution.
To prepare the ideal cleaning mixture, start by selecting a clear, mild antibacterial soap. Measure out a small amount – approximately a pea-sized drop – and mix it with lukewarm water in a clean container. The water should be warm enough to help dissolve the soap but not hot enough to potentially warp the aligner material. Gently swirl the mixture until the soap is completely dissolved, creating a clear, uniform solution.
According to research from the 2thDoc Dental Clinic, soaking aligners in a carefully prepared solution for about 20 minutes can effectively loosen plaque and remove stubborn debris. This method provides a deep clean without risking damage to your aligners.
Key considerations for your cleaning solution:
- Use only clear, unscented antibacterial soap
- Ensure water is lukewarm, not hot
- Mix thoroughly to create a uniform solution
- Avoid colored or scented cleaning agents
- Prepare fresh solution for each cleaning session
If you prefer an alternative to soap-based solutions, specialized aligner cleaning crystals offer another effective option. These crystals are specifically designed to clean aligners without causing discoloration or damage. Simply dissolve the recommended number of crystals in lukewarm water and follow the manufacturer’s instructions carefully.
Verify your solution’s effectiveness by checking that it creates a clear, gentle mixture without any visible residue or strong odor. The cleaning solution should feel mild to the touch and leave no cloudiness or film on the aligners when used correctly. By taking these careful steps, you ensure your aligners remain clean, clear, and in optimal condition throughout your treatment.
Step 4: Soak Aligners in the Solution
Soaking your aligners is a crucial step in maintaining their cleanliness and preventing bacterial growth. This process goes beyond surface cleaning, providing a deep sanitization that helps preserve the transparency and hygiene of your orthodontic appliances.
Timing is critical when soaking your aligners. The ideal soaking duration typically ranges between 15 to 20 minutes, which allows the cleaning solution to effectively break down bacteria and remove microscopic debris without risking damage to the aligner material. Select a clean, dedicated container that is large enough to fully submerge your aligners without folding or bending them.
Gently place your aligners into the prepared cleaning solution, ensuring they are completely covered. Avoid using excessive force or touching the aligners with dirty hands. If using specialized cleaning crystals, follow the manufacturer’s instructions precisely regarding the recommended amount and dissolution time. For soap-based solutions, gently swirl the container to help distribute the cleaning agents evenly around the aligners.
According to research from orthodontic studies, consistent and proper soaking is essential for preventing biofilm formation and maintaining oral hygiene during orthodontic treatment. The soaking process helps eliminate bacteria that can accumulate during daily wear.
Important considerations during the soaking process:
- Use a clean, dedicated container for soaking
- Ensure aligners are fully submerged
- Maintain soaking time between 15-20 minutes
- Avoid touching aligners with unclean hands
- Do not soak aligners in hot water
While soaking, take this opportunity to inspect your aligners for any signs of wear, discoloration, or damage. Look for tiny scratches, cloudiness, or irregularities that might indicate the need for replacement. The soaking process provides an excellent chance to perform a visual assessment of your aligners’ condition.
After the recommended soaking time, carefully remove the aligners from the solution. Rinse them thoroughly with lukewarm water to remove any remaining cleaning solution. Gently pat dry with a clean, lint-free towel, ensuring no moisture remains that could harbor bacteria. Your aligners should now appear clear, clean, and ready for reinsertion, continuing your path to a perfect smile.
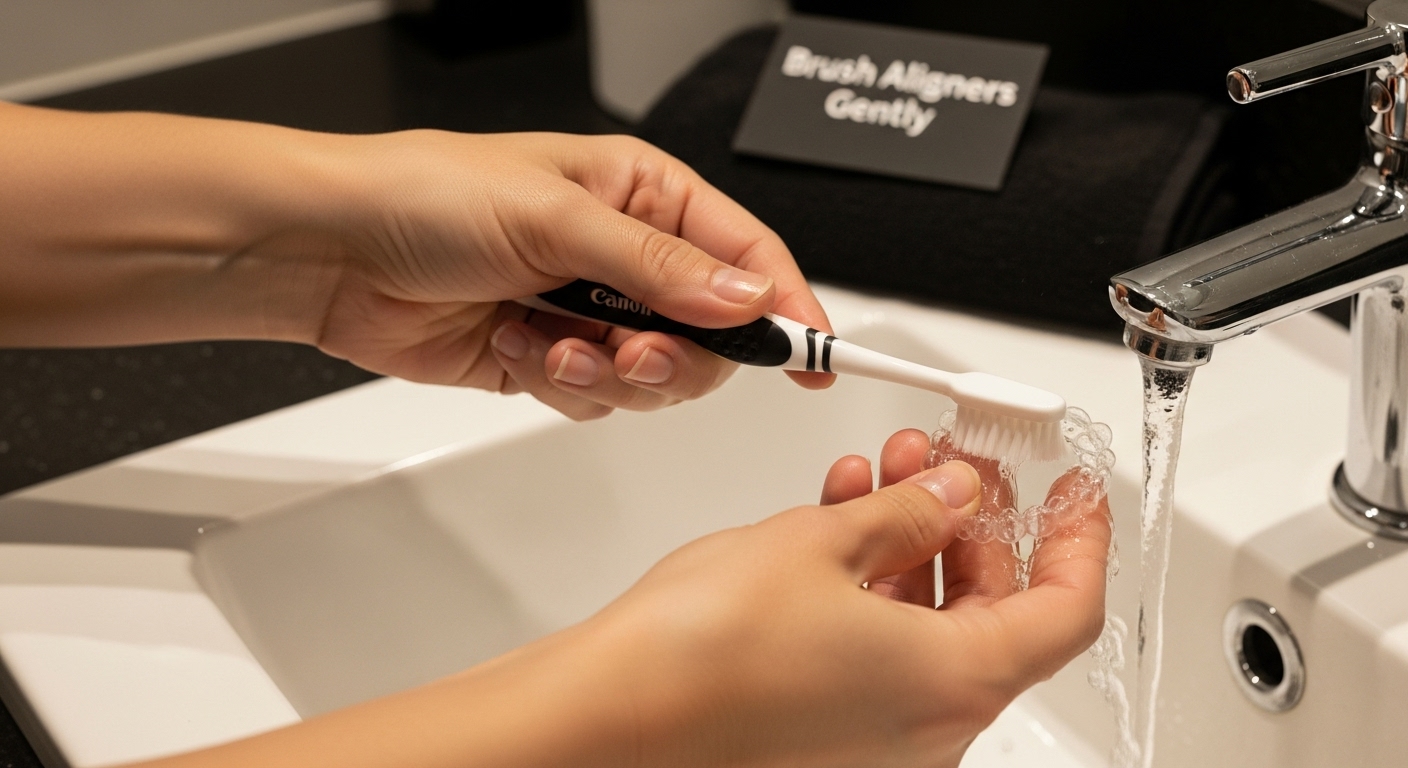
Step 5: Brush Aligners Gently
Brushing your aligners is a delicate process that requires precision and care to maintain their transparency and prevent potential damage. This step is crucial for removing any remaining debris or bacteria that might have survived the soaking process, ensuring your aligners remain clean and hygienic.
Select a soft-bristled toothbrush specifically dedicated to cleaning your aligners. This brush should be separate from your regular dental hygiene toothbrush to prevent cross-contamination and potential scratching. The bristles should be incredibly soft, almost delicate enough to barely make contact with the aligner surface while still providing effective cleaning.
Begin by holding the aligner under lukewarm running water, then gently brush in circular motions. Apply minimal pressure to avoid creating micro-scratches that could compromise the aligner’s smooth surface. Focus on areas with visible buildup or around attachment points, where plaque tends to accumulate. Use gentle, sweeping motions rather than aggressive scrubbing, treating the aligners as if they were made of delicate glass.
According to research from the Texas Association of Orthodontists, it is essential to avoid using toothpaste during this process. Many toothpastes contain abrasive materials that can create microscopic scratches, making your aligners appear cloudy and potentially harboring more bacteria.
Critical brushing guidelines:
- Use a separate, soft-bristled toothbrush for aligners
- Brush in gentle, circular motions
- Avoid applying excessive pressure
- Focus on areas with visible debris
- Rinse thoroughly after brushing
Pay special attention to the edges and attachment points of your aligners. These areas are most prone to plaque buildup and require careful, thorough cleaning. Rotate the aligner as you brush to ensure you cover every surface, including hard-to-reach areas. The goal is to create a smooth, clean surface without introducing any additional wear or damage.
After brushing, hold the aligner up to the light and inspect it carefully. Your aligners should appear crystal clear, with no visible debris or cloudy areas. If you notice any persistent stains or buildup, consult your orthodontist for professional guidance rather than increasing brushing intensity. By treating your aligners with this level of careful attention, you ensure they remain effective and nearly invisible throughout your orthodontic treatment.
Step 6: Rinse and Store Aligners Properly
The final step in maintaining your aligners involves thorough rinsing and careful storage, which is crucial for preserving their cleanliness and preventing potential bacterial growth. This process serves as the ultimate protection for your orthodontic investment, ensuring your aligners remain hygienic and functional between uses.
Rinse your aligners thoroughly with lukewarm water immediately after cleaning, making certain no soap residue or cleaning solution remains. Hold the aligners under a gentle stream of water, rotating them to ensure complete coverage. Use your clean fingers to carefully remove any remaining moisture or potential debris, paying special attention to edges and attachment points where residue might accumulate.
Your storage container is equally important as the cleaning process itself. Select a dedicated, hard-sided case that is clean, dry, and specifically designed for orthodontic aligners. Avoid using makeshift containers or leaving aligners exposed to air, which can introduce additional bacteria and potentially cause warping. The case should be ventilated to prevent moisture buildup while providing complete protection from external contaminants.
According to research from the National Institute of Dental and Craniofacial Research, proper storage of dental appliances is critical in maintaining oral hygiene and preventing potential bacterial growth. Your storage approach can significantly impact the longevity and effectiveness of your aligners.
Essential storage guidelines:
- Use a clean, hard-sided aligner case
- Ensure case is dry before storing aligners
- Keep case away from direct sunlight
- Avoid storing near heat sources
- Clean storage case weekly
Before placing aligners in their storage case, perform a final visual inspection. Check for any remaining water droplets, debris, or potential discoloration. The aligners should appear crystal clear and feel smooth to the touch. If you notice any irregularities, consider consulting your orthodontist for guidance.
Remember that your storage habits are just as important as your cleaning routine. A well-maintained aligner case protects your aligners from dust, bacteria, and potential damage when not in use. By following these careful storage practices, you ensure your aligners remain in optimal condition, supporting your journey to a perfect smile.
Unlock the Full Potential of Your Aligners with Expert Support
Struggling to keep your aligners crystal clear and free from bacteria can be frustrating. You may worry that simple mistakes like using the wrong cleaning agent or skipping a step could impact your results or even your oral health. At Glow Orthodontics, we understand how important proper aligner care is to reaching your dream smile. Our patients often ask about gentle cleaning methods, the risks of cloudiness, and how to prevent invisible aligners from becoming stained or damaged. Every step in your journey, from rinsing and soaking to storage, matters—and our experienced team is here to guide you with the right expertise.

Ready for support that goes beyond at-home care? Experience confidence in every step of your treatment by choosing a provider focused on lasting results and patient comfort. Visit Glow Orthodontics to connect with our friendly team, book your consultation, or ask questions about clear aligner maintenance. Discover more about our personalized orthodontic treatments right on our homepage and start taking real steps toward a glowing, healthy smile today.
Frequently Asked Questions
How often should I clean my aligners?
You should clean your aligners daily to maintain their hygiene and transparency. Incorporate rinsing, soaking, and brushing into your routine for optimal results.
Can I use regular toothpaste to clean my aligners?
No, it’s recommended to avoid using regular toothpaste, as many contain abrasive materials that can scratch the surface of your aligners. Instead, use a soft-bristled toothbrush with mild antibacterial soap.
What should I soak my aligners in?
You can soak your aligners in a solution of lukewarm water mixed with clear, unscented antibacterial soap or specialized aligner cleaning crystals. Avoid harsh chemicals and colored solutions to prevent staining.
How should I store my aligners when not in use?
Store your aligners in a clean, hard-sided case that is dry and ventilated to prevent moisture buildup. Ensure they are free from debris and water before storing them to maintain their cleanliness.