How to Clean Invisalign Trays: Easy Steps for a Fresher Smile
November 16, 2025
How to Clean Invisalign Trays: Easy Steps for a Fresher Smile
Over half of Invisalign users admit to struggling with keeping their aligners truly clean. A spotless tray does more than just look good. It protects your teeth and helps prevent bad breath or cloudiness. Before you start brushing or soaking your aligners, setting up your cleaning space the right way can make the whole process quicker and more effective. This simple routine keeps your Invisalign trays clear, hygienic, and ready for daily use.
Table of Contents
- Step 1: Prepare Your Cleaning Space And Gather Supplies
- Step 2: Rinse Invisalign Trays Immediately After Removal
- Step 3: Brush Trays Gently Using Safe Cleaning Methods
- Step 4: Soak Trays In Approved Natural Cleaning Solutions
- Step 5: Inspect Trays For Clarity And Cleanliness Before Use
Quick Summary
| Key Point | Explanation |
|---|---|
| 1. Set up a clean cleaning station | Choose a dedicated area with good lighting and gather necessary cleaning supplies nearby. |
| 2. Rinse trays after each removal | Rinse Invisalign trays under lukewarm water immediately after removal to reduce bacteria. |
| 3. Brush gently with a soft brush | Use a separate soft-bristled toothbrush and mild soap to carefully clean all tray surfaces. |
| 4. Soak in approved solutions | Soak trays in a 1:1 mixture of hydrogen peroxide and water for 30 minutes to sanitize them. |
| 5. Inspect for cleanliness before use | Check the clarity and cleanliness of trays under good light before placing them back. |
Step 1: Prepare your cleaning space and gather supplies
Cleaning your Invisalign trays requires a systematic approach that starts with setting up a proper cleaning station. You want a clean workspace where you can thoroughly but carefully sanitize your aligners without risking contamination or damage. This means selecting a dedicated area with good lighting and all your necessary cleaning supplies within reach.
First, gather your essential cleaning materials. You will need lukewarm water, a soft toothbrush designated only for your Invisalign trays, antibacterial hand soap or specialized Invisalign cleaning crystals, and a clean towel. As recommended by Kirkby Dental, always have your aligner case nearby to store your trays safely during the cleaning process. Avoid using paper towels or random surfaces where bacteria might lurk.
Pro tip: Choose a bathroom or kitchen counter with a clean, flat surface and good lighting. Wash your hands thoroughly before handling your aligners to minimize introducing additional bacteria. Remember that a clean workspace is your first defense in maintaining hygienic and crystal clear Invisalign trays. Your next step will involve the actual cleaning process, so having everything organized and ready will make the entire routine smooth and efficient.
Step 2: Rinse Invisalign trays immediately after removal
Every time you remove your Invisalign trays particularly before eating or drinking anything except plain water you need to rinse them thoroughly. The goal is to prevent bacterial buildup and remove any saliva or food particles that might stick to your aligners and create an environment for potential contamination.
Start by holding your aligners under lukewarm running water. Gently move the trays around to ensure water flows through all surfaces and crevices. Healthline warns that simply rinsing your aligners might make them appear cleaner but does not effectively address the unseen bacteria that can accumulate. So while rinsing is an essential first step it is not a complete cleaning solution.
Quick pro tip: Use your clean hands to rotate and manipulate the trays under the water stream ensuring that every nook and cranny gets rinsed. Avoid using hot water as it can warp the plastic material of your aligners. This quick rinse prepares your trays for the next detailed cleaning step and helps maintain their transparency and hygiene.
The next phase of your Invisalign cleaning routine will involve more thorough sanitization techniques.
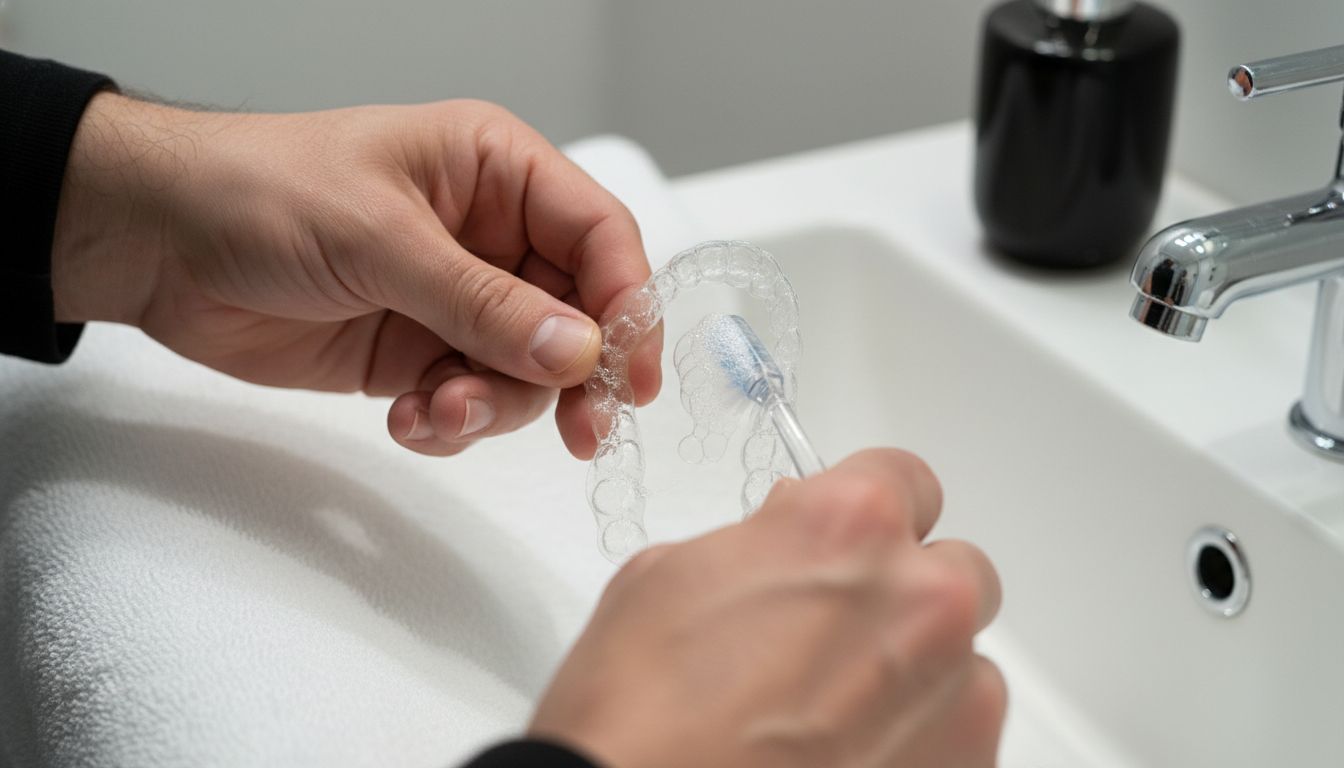
Step 3: Brush trays gently using safe cleaning methods
Gentle brushing is a critical step in maintaining the cleanliness and transparency of your Invisalign trays. This process helps remove accumulated debris and prevents potential bacterial growth that could compromise both your oral health and the appearance of your aligners.
Healthline recommends using a soft bristled toothbrush specifically dedicated to cleaning your aligners. Select a separate toothbrush from the one you use for your teeth to avoid cross contamination. Apply a small amount of clear unscented antibacterial soap and use gentle circular motions to clean all surfaces of the trays. The key is to be thorough yet delicate to prevent scratching or damaging the aligner material.
Quick pro tip: Always use lukewarm water and avoid applying excessive pressure while brushing. Harsh scrubbing can create microscopic scratches that trap bacteria and make your aligners look cloudy. After brushing rinse the trays thoroughly to remove all soap residue.
 This careful cleaning method ensures your Invisalign trays remain clean transparent and hygienic. The next step in your cleaning routine will focus on additional sanitization techniques to keep your aligners in top condition.
Step 4: Soak trays in approved natural cleaning solutions
Soaking your Invisalign trays in specialized cleaning solutions is an essential step to eliminate bacteria and maintain their crystal clear appearance. This deep cleaning method goes beyond simple rinsing and brushing to ensure your aligners remain completely sanitized and fresh.
Dawson Dental recommends creating a powerful natural cleaning solution by mixing equal parts hydrogen peroxide and water. Carefully place your trays in this solution and let them soak for approximately 30 minutes. This approach helps ensure your aligners become completely spotless and bacteria free. The hydrogen peroxide works to break down and eliminate any lingering microorganisms that might have survived your initial cleaning steps.
Quick pro tip: Always use lukewarm water when preparing your soaking solution and avoid extremely hot temperatures that could potentially warp your aligners. After soaking rinse your trays thoroughly with cool water to remove any remaining cleaning solution. This meticulous soaking process is your final line of defense in maintaining optimal oral hygiene and keeping your Invisalign trays in pristine condition. Your next step will involve careful drying and storage to complete the cleaning routine.
Step 5: Inspect trays for clarity and cleanliness before use
Before placing your Invisalign trays back into your mouth take a moment to thoroughly examine them for overall cleanliness and transparency. This final quality check ensures you are maintaining the highest standards of oral hygiene and protecting your investment in clear aligners.
Murphy Dental Oak Park emphasizes that knowing how to clean Invisalign trays makes the critical difference between fresh clear aligners and cloudy odor trapping ones. Hold your trays up to good lighting and carefully inspect for any remaining residue white spots cloudiness or discoloration. Look closely at all surfaces including edges and inner surfaces where buildup can easily hide. If you notice any areas that did not get completely clean during your previous cleaning steps repeat the washing or soaking process before wearing.
Quick pro tip: Use natural daylight or a bright white light to perform your inspection. This allows you to see even the smallest imperfections that might not be visible under dim lighting. If your trays appear anything less than crystal clear take the extra time to clean them again.
![]() Your diligence will help maintain the aligners effectiveness and your oral health. The next phase of your treatment involves wearing your freshly cleaned trays with confidence.
Your diligence will help maintain the aligners effectiveness and your oral health. The next phase of your treatment involves wearing your freshly cleaned trays with confidence.
Keep Your Invisalign Trays Spotless with Expert Support from Glow Orthodontics
Cleaning your Invisalign trays properly is crucial to maintain their clarity and protect your smile from bacteria. From gentle brushing to soaking in natural solutions these easy yet essential steps can sometimes feel overwhelming. If you want personalized guidance tailored to your unique Invisalign treatment Glow Orthodontics in Langley is here to help. Our professional team understands the challenges of keeping aligners fresh and clear and provides expert advice throughout your journey.

Don’t wait until your aligners lose their sparkle or start causing discomfort. Visit Glow Orthodontics to discover how our dedicated Invisalign services combine expert care with a welcoming environment. Learn more about our treatment process and read real patient stories that show how we help smiles shine brighter every day. Book your consultation today and take control of your Invisalign care with trusted support just a click away.
Frequently Asked Questions
How often should I clean my Invisalign trays?
Cleaning your Invisalign trays daily is recommended to prevent bacteria buildup. Make sure to rinse them after each removal and perform a complete cleaning routine at least once a day.
What supplies do I need to clean my Invisalign trays?
You will need lukewarm water, a soft-bristled toothbrush, antibacterial soap or Invisalign cleaning crystals, and a clean towel. Gather these materials at your cleaning station to ensure a thorough and efficient cleaning process.
Can I use regular toothpaste to clean my Invisalign trays?
Avoid using regular toothpaste, as it may scratch your trays and create areas for bacteria to hide. Instead, opt for clear antibacterial soap or specialized cleaning solutions specifically designed for aligners.
How do I inspect my Invisalign trays for cleanliness?
Hold your trays up to good lighting and check for any residue or cloudiness. If you notice any imperfections, repeat the cleaning or soaking process until they appear crystal clear before reinserting them into your mouth.
What is the best way to soak my Invisalign trays for a deep clean?
Mix equal parts hydrogen peroxide and water for an effective soaking solution. Let your trays soak for about 30 minutes, then rinse them thoroughly with cool water to ensure all cleaning solution is removed.
Is rinsing enough to keep my Invisalign trays clean?
Rinsing is a necessary first step, but it is not sufficient by itself. Always follow rinsing with a gentle brushing and soaking routine to effectively eliminate bacteria and maintain the trays’ clarity.