Master Dental Hygiene with Braces: Your Step-by-Step Guide
August 31, 2025
Master Dental Hygiene with Braces: Your Step-by-Step Guide
Getting braces is a big step for your smile and your dental routine is about to change in a big way. Think your old toothbrush and toothpaste can handle the job? Not a chance. People with braces need specialized cleaning tools like floss threaders and interdental brushes to keep their teeth truly healthy and avoid costly problems. Most people miss this and end up with permanent stains or decay even after their braces come off.
Table of Contents
- Step 1: Gather Essential Dental Hygiene Tools
- Step 2: Establish a Brushing Routine
- Step 3: Implement Flossing Techniques for Braces
- Step 4: Choose Appropriate Mouthwash for Braces
- Step 5: Schedule Regular Dental Check-ups
Quick Summary
| Key Point | Explanation |
|---|---|
| 1. Assemble specialized dental hygiene tools. | Use an orthodontic toothbrush, floss threaders, and interdental brushes for effective cleaning around braces. |
| 2. Establish a consistent brushing routine. | Brush after every meal or at least twice daily, focusing on each quadrant for comprehensive cleaning. |
| 3. Implement strategic flossing techniques. | Use a floss threader to navigate around wires and brackets, ensuring thorough plaque removal daily. |
| 4. Choose an appropriate mouthwash. | Select an alcohol-free, fluoride-containing mouthwash with antimicrobial properties for added protection. |
| 5. Schedule regular dental check-ups. | Visit your orthodontist every four to six weeks to monitor progress and address any concerns promptly. |
Step 1: Gather Essential Dental Hygiene Tools
Successful dental hygiene with braces begins with assembling the right tools. Unlike traditional tooth cleaning, orthodontic care requires specialized equipment that can navigate the complex landscape of brackets, wires, and tight spaces. Your mission is to create a comprehensive oral care kit that will keep your teeth spotlessly clean and protect your orthodontic investment.
Essential Tools for Braces Care
Start by gathering a collection of targeted cleaning instruments specifically designed for orthodontic patients. You will need:
- Soft-bristled orthodontic toothbrush with a smaller head for precise cleaning around brackets
- Fluoride toothpaste to strengthen enamel and prevent decay
- Floss threaders to navigate underneath orthodontic wires
- Interdental brushes for cleaning between brackets and hard-to-reach areas
- Orthodontic wax to manage any wire irritation
- Oral irrigator/water flosser for deep cleaning between teeth and around brackets
Choosing the right tools is more than just purchasing random dental products. According to Nationwide Children’s Hospital, using specialized equipment designed for orthodontic patients dramatically improves cleaning effectiveness and oral health outcomes.
When selecting your tools, prioritize quality and precision. A standard toothbrush simply won’t provide the meticulous cleaning required when you have braces. Look for brushes with compact heads and soft, rounded bristles that can easily maneuver around brackets without causing damage. Your interdental brushes should be thin enough to slip between wires and brackets, removing plaque and food particles that traditional brushing might miss.
Your oral irrigator will become a game-changing tool in your dental hygiene arsenal. These devices use pressurized water streams to blast away debris and bacteria from areas your brush can’t reach. By incorporating this technology into your routine, you create an additional layer of protection against potential tooth decay and gum inflammation.
Remember that your dental hygiene toolkit is an investment in your long-term oral health. Each tool serves a specific purpose in maintaining clean, healthy teeth throughout your orthodontic journey.
Below is a summary table highlighting the essential dental hygiene tools needed for effective braces care, along with their primary purposes.
| Tool | Purpose |
|---|---|
| Orthodontic toothbrush | Precise cleaning around brackets and wires |
| Fluoride toothpaste | Strengthens enamel and prevents tooth decay |
| Floss threaders | Guides floss under orthodontic wires |
| Interdental brushes | Cleans between brackets and hard-to-reach areas |
| Orthodontic wax | Reduces irritation from wires and brackets |
| Oral irrigator/water flosser | Deep cleaning between teeth and around braces |
Step 2: Establish a Brushing Routine
Creating a consistent and thorough brushing routine is critical when you have braces. Your new orthodontic hardware dramatically changes how you need to approach dental hygiene, transforming a simple task into a precise cleaning mission. Unlike traditional tooth brushing, braces demand a more strategic and meticulous approach to ensure every surface gets properly cleaned.
The Four Quadrant Cleaning Method
Divide your mouth into four distinct sections: upper right, upper left, lower right, and lower left. This systematic approach ensures you give equal attention to every tooth surface, including those tricky areas around brackets and wires. Begin by positioning your toothbrush at a 45-degree angle to your gumline, using gentle circular motions that clean both the tooth surface and the bracket edges.
According to the American Dental Association, you should spend at least two minutes brushing, dedicating approximately 30 seconds to each quadrant. Timing is crucial. Use a timer or electric toothbrush with a built-in timer to ensure you’re giving each section adequate attention. Move your brush in multiple directions – horizontal, vertical, and circular – to dislodge food particles and plaque that can easily get trapped in your orthodontic appliances.
When brushing with braces, think of yourself as a dental detective. Your mission is to investigate every nook and cranny around brackets and wires. Start with the bracket surfaces, gently brushing above and below each bracket. Angle your brush to clean underneath the wire, using soft, precise strokes that remove debris without damaging your orthodontic equipment.
Pro Brushing Techniques
- Hold your toothbrush at a 45-degree angle to your gums
- Use gentle, circular motions
- Brush above and below each bracket
- Clean wire surfaces carefully
- Spend 30 seconds in each mouth quadrant
Remember that pressure is your enemy. Brushing too hard can damage brackets and irritate your gums. Use a light touch with your soft-bristled brush, allowing the bristles to do the work without forceful scrubbing. If you notice your toothbrush bristles becoming frayed or flattened quickly, you’re likely applying too much pressure.
Consistency is the hallmark of excellent dental hygiene with braces. Brush after every meal if possible, or at minimum twice daily. Carry a travel toothbrush and small tube of toothpaste to clean your teeth after lunch or snacks. By making your brushing routine a non-negotiable part of your daily life, you’ll protect your teeth, maintain your braces, and ensure a stunning smile when your orthodontic journey is complete.
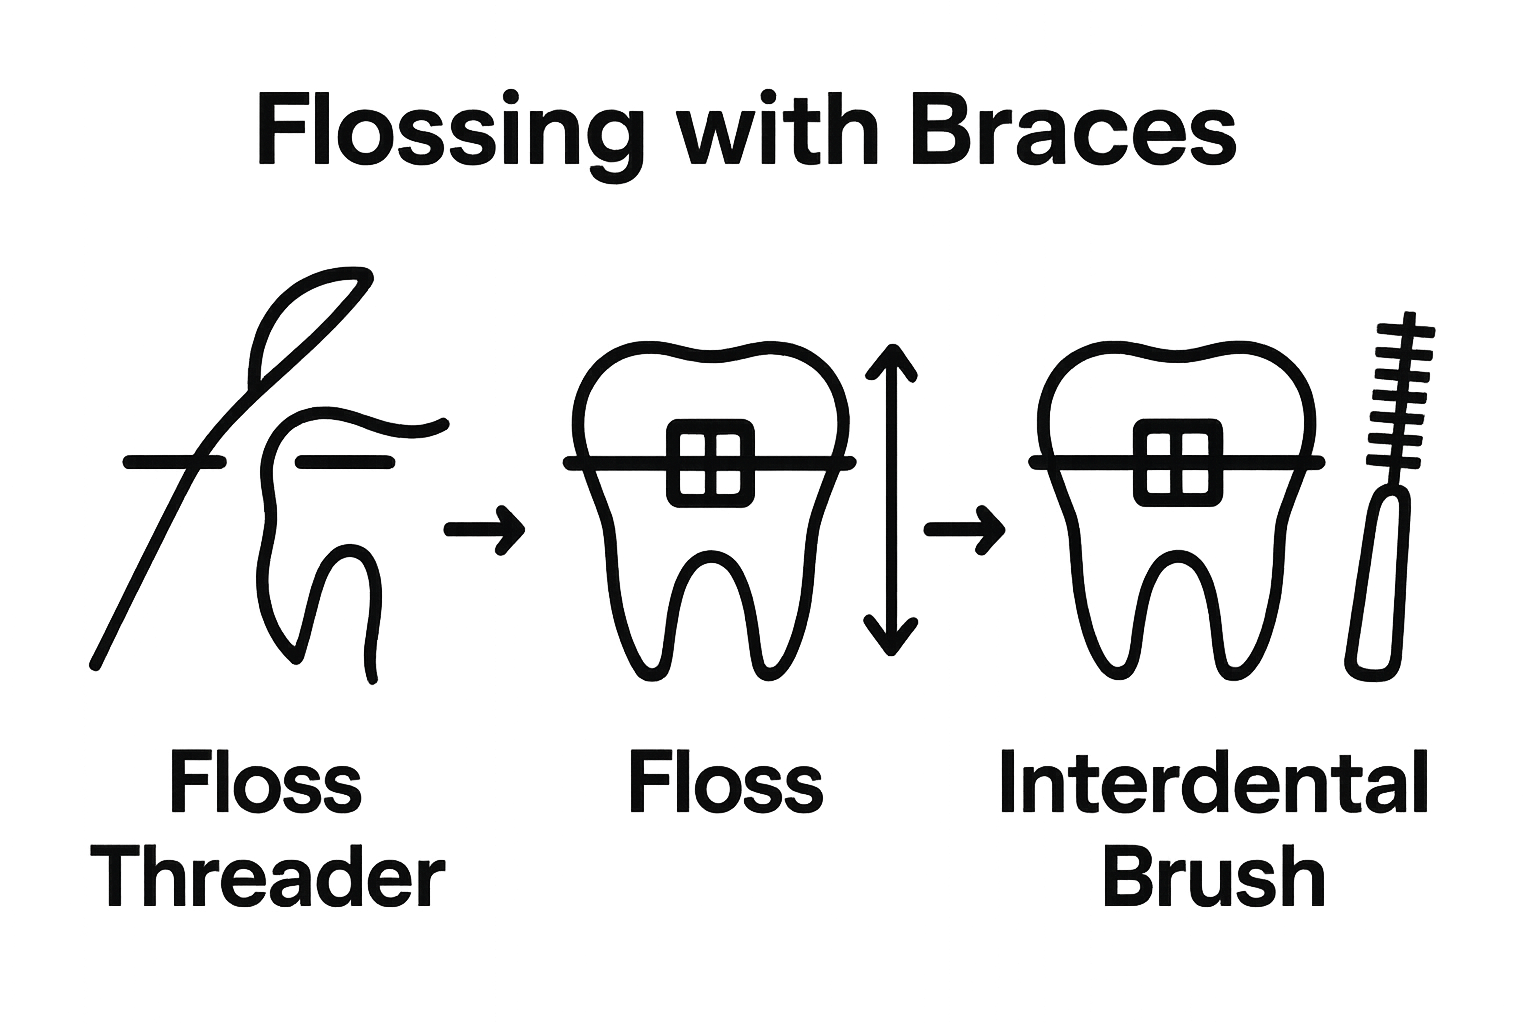
Step 3: Implement Flossing Techniques for Braces
Flossing with braces transforms from a simple task to a strategic dental operation. Traditional flossing methods become nearly impossible when metal wires and brackets interrupt your typical cleaning routine. Your new approach requires patience, precision, and specialized tools that can navigate the complex landscape of your orthodontic hardware.
The Floss Threader Technique
Your primary weapon in this dental hygiene battle is the floss threader – a thin, flexible plastic tool designed to slip underneath orthodontic wires. Think of it like a needle that guides your dental floss exactly where it needs to go. Begin by cutting a piece of floss approximately 18 inches long, which provides enough length to manipulate around your braces without becoming tangled.
Thread the floss through the plastic threader, then carefully guide the threader under the main wire connecting your brackets. Once positioned, slide the floss up and down against each tooth surface, creating a gentle cleaning motion that removes trapped food particles and prevents plaque buildup. Pay extra attention to the areas directly next to your brackets, where food tends to accumulate most aggressively.
Critical Flossing Steps
- Use a floss threader to navigate under primary orthodontic wires
- Gently slide floss up and down each tooth surface
- Clean both sides of each tooth thoroughly
- Move systematically through your entire mouth
- Rinse with water after completing flossing
According to a comprehensive research study, using specialized flossing techniques significantly improves plaque removal and overall oral health for patients with braces. The key is consistency and patience. Expect your first few attempts to feel awkward and time-consuming. With practice, you’ll develop a smooth, efficient technique that becomes second nature.
Consider incorporating interdental brushes alongside your floss threader for even more comprehensive cleaning. These tiny brushes can slip between brackets and wires, providing an additional layer of debris removal that traditional flossing might miss.
 Some orthodontic patients find alternating between floss threaders and interdental brushes creates the most thorough cleaning approach.
Remember that timing matters. Floss at least once daily, preferably before bedtime. This ensures that no food particles remain trapped overnight, which could lead to bacterial growth and potential tooth decay. Your future self will thank you for the diligent care you’re providing today. By mastering these flossing techniques, you’re not just cleaning your teeth – you’re protecting your long-term dental health and ensuring a stunning smile when your braces come off.
Step 4: Choose Appropriate Mouthwash for Braces
Mouthwash becomes your secret weapon in maintaining optimal oral hygiene during orthodontic treatment. Unlike standard oral rinses, your mouthwash selection requires strategic thinking that goes beyond simple fresh breath. With braces creating countless tiny spaces for bacteria to hide, you need a targeted solution that can penetrate areas your brush and floss might miss.
Understanding Mouthwash Ingredients
Not all mouthwashes are created equal, especially when you have braces. Alcohol-free formulations are crucial, as alcohol-based rinses can dry out your mouth and potentially irritate sensitive gum tissues already stressed by orthodontic hardware. Look for therapeutic mouthwashes containing fluoride and antimicrobial agents that provide comprehensive protection against plaque and potential decay.
Your ideal mouthwash should accomplish multiple objectives simultaneously. First, it needs to reach those microscopic spaces around brackets and wires where food particles love to hide. Second, it must strengthen tooth enamel through fluoride content. Third, it should help reduce inflammation and support overall gum health during your orthodontic journey.
According to the American Dental Association, therapeutic mouthwashes play a critical role in comprehensive oral care. When selecting your rinse, prioritize products that carry the ADA Seal of Acceptance, which guarantees the product has been scientifically tested and proven effective.
Mouthwash Selection Criteria
- Alcohol-free formulation
- Contains fluoride
- Antimicrobial properties
- ADA Seal of Acceptance
- Gentle on sensitive gum tissues
- Specific orthodontic care benefits
Technique matters as much as product selection. When using mouthwash with braces, take a slightly different approach compared to traditional rinsing. Swish the liquid carefully and deliberately, ensuring it flows around each bracket and wire. Tilt your head at different angles to allow the rinse to reach challenging areas. Hold the mouthwash in your mouth for the full recommended time typically 30 to 60 seconds to maximize its therapeutic benefits.
Consider keeping two types of mouthwash in your arsenal. A daily fluoride rinse for general maintenance and a more targeted antimicrobial solution for periodic deep cleaning. This approach provides comprehensive protection against the unique challenges braces present. Some orthodontic patients find alternating between different therapeutic rinses helps prevent bacterial resistance and provides varied oral health benefits.
Remember that mouthwash is a supplemental tool, not a replacement for brushing and flossing. Think of it as the final protective layer in your dental hygiene routine. By selecting the right product and using it correctly, you’re not just maintaining clean teeth you’re actively protecting your long-term oral health and ensuring a beautiful smile when your braces come off.
Step 5: Schedule Regular Dental Check-ups
Dental check-ups during orthodontic treatment are not just routine appointments they are critical strategic meetings that protect your long-term oral health. With braces creating a complex environment in your mouth, professional oversight becomes essential in preventing potential complications and ensuring your treatment progresses smoothly.
Frequency and Preparation
Typically, you’ll need more frequent dental visits during orthodontic treatment compared to your pre-braces schedule. Most orthodontic patients should plan for check-ups every four to six weeks, alternating between their orthodontist and general dentist. This dual approach ensures comprehensive monitoring of both your orthodontic progress and overall dental health.
Before each appointment, compile a list of observations and potential concerns. Document any discomfort, unusual sensations around your brackets, or changes in how your braces feel. These details provide valuable insights for your dental professionals. Pay attention to signs like increased sensitivity, minor pain when eating, or unexpected bracket movement. These might seem insignificant to you but could indicate critical adjustments needed in your treatment plan.
According to research published in the National Library of Medicine, professional monitoring during orthodontic treatment helps detect early signs of potential issues like enamel demineralization, which can occur more frequently with braces. Your dental team can intervene proactively, preventing minor problems from developing into more significant complications.
Comprehensive Check-up Checklist
- Orthodontic hardware inspection
- Professional cleaning around brackets
- Enamel and gum health assessment
- Bite alignment evaluation
- Discussion of oral hygiene techniques
Prepare for your appointments by practicing excellent oral hygiene beforehand. Clean your teeth thoroughly, ensuring no food particles remain trapped in your braces. This not only makes the professional cleaning easier but also demonstrates your commitment to maintaining optimal oral health. Consider bringing your specialized cleaning tools like interdental brushes or floss threaders to show your dental professional and receive personalized advice on their usage.
Each dental visit is an opportunity for education and refinement. Your dental professionals can provide personalized guidance on cleaning techniques, recommend specialized products, and address any emerging concerns. They might offer insights into areas where your current oral hygiene routine could be improved, helping you prevent potential issues before they become problematic.
Here is a checklist table to help you prepare for and maximize your regular dental check-up appointments during orthodontic treatment.
| Check-up Task | Description |
|---|---|
| Orthodontic hardware inspection | Professional examination of wires and brackets |
| Professional cleaning | Removal of plaque and debris around brackets |
| Enamel and gum health assessment | Check for demineralization and gum issues |
| Bite alignment evaluation | Assess and track progress of tooth alignment |
| Oral hygiene technique discussion | Receive personalized cleaning advice |
| List concerns/observations | Share discomfort or unusual changes with your team |
Think of these check-ups as collaborative sessions where you and your dental team work together to ensure the success of your orthodontic treatment. By staying proactive, maintaining open communication, and following professional recommendations, you’re not just maintaining your teeth you’re investing in a healthy, beautiful smile that will last a lifetime.
Ready for a Healthier Smile With Braces? Glow Orthodontics Can Help
Struggling to keep your braces clean can be stressful. This guide showed how specialized tools, precise routines, and regular check-ups are crucial for preventing tooth decay and gum problems during orthodontic treatment. But even with the right knowledge, having professional support and personalized advice makes all the difference.
Your journey to a confident, healthy smile is easier with a caring team by your side. At Glow Orthodontics, you’ll find experienced professionals who understand the challenges of braces and offer solutions that fit your needs, including detailed cleaning tips and seamless check-up scheduling. Our approach prioritizes comfort, personalized care, and a welcoming environment for every patient.

Take the next step toward a glowing smile with expert guidance designed just for you. Visit our homepage to discover how easy it is to book your appointment, access professional care, and get answers to your braces questions. Don’t let small hygiene issues turn into bigger problems. Choose Glow Orthodontics for support at every stage of your braces journey today.
Frequently Asked Questions
What tools do I need for dental hygiene with braces?
You’ll need a soft-bristled orthodontic toothbrush, fluoride toothpaste, floss threaders, interdental brushes, orthodontic wax, and an oral irrigator for effective cleaning around brackets and wires.
How should I establish a brushing routine with braces?
Divide your mouth into four sections and brush for two minutes, spending about 30 seconds on each quadrant. Brush at a 45-degree angle to your gums, using gentle circular motions around the brackets and wires.
What is the best way to floss with braces?
Use a floss threader to carefully navigate the floss under the wire, gently sliding it up and down against each tooth surface. It’s important to floss at least once daily, focusing on the areas next to brackets where food particles can accumulate.
How can mouthwash benefit someone with braces?
Mouthwash helps reach areas that brushing and flossing might miss, providing additional protection against plaque and cavities. Look for an alcohol-free, fluoride-containing mouthwash with antimicrobial properties for best results.