How to Floss with Braces: A Step-by-Step Guide
October 13, 2025
How to Floss with Braces: A Step-by-Step Guide
Flossing with braces sounds like a hassle until you realize how much it matters for your smile. Brace yourself for this. People with braces are up to twice as likely to develop plaque-related dental issues if they skip proper cleaning around brackets and wires. Yet most never hear that the real secret is in the prep and technique, not just the flossing itself. Armed with a few smart tools and steps, anyone can make perfect flossing with braces totally achievable.
Table of Contents
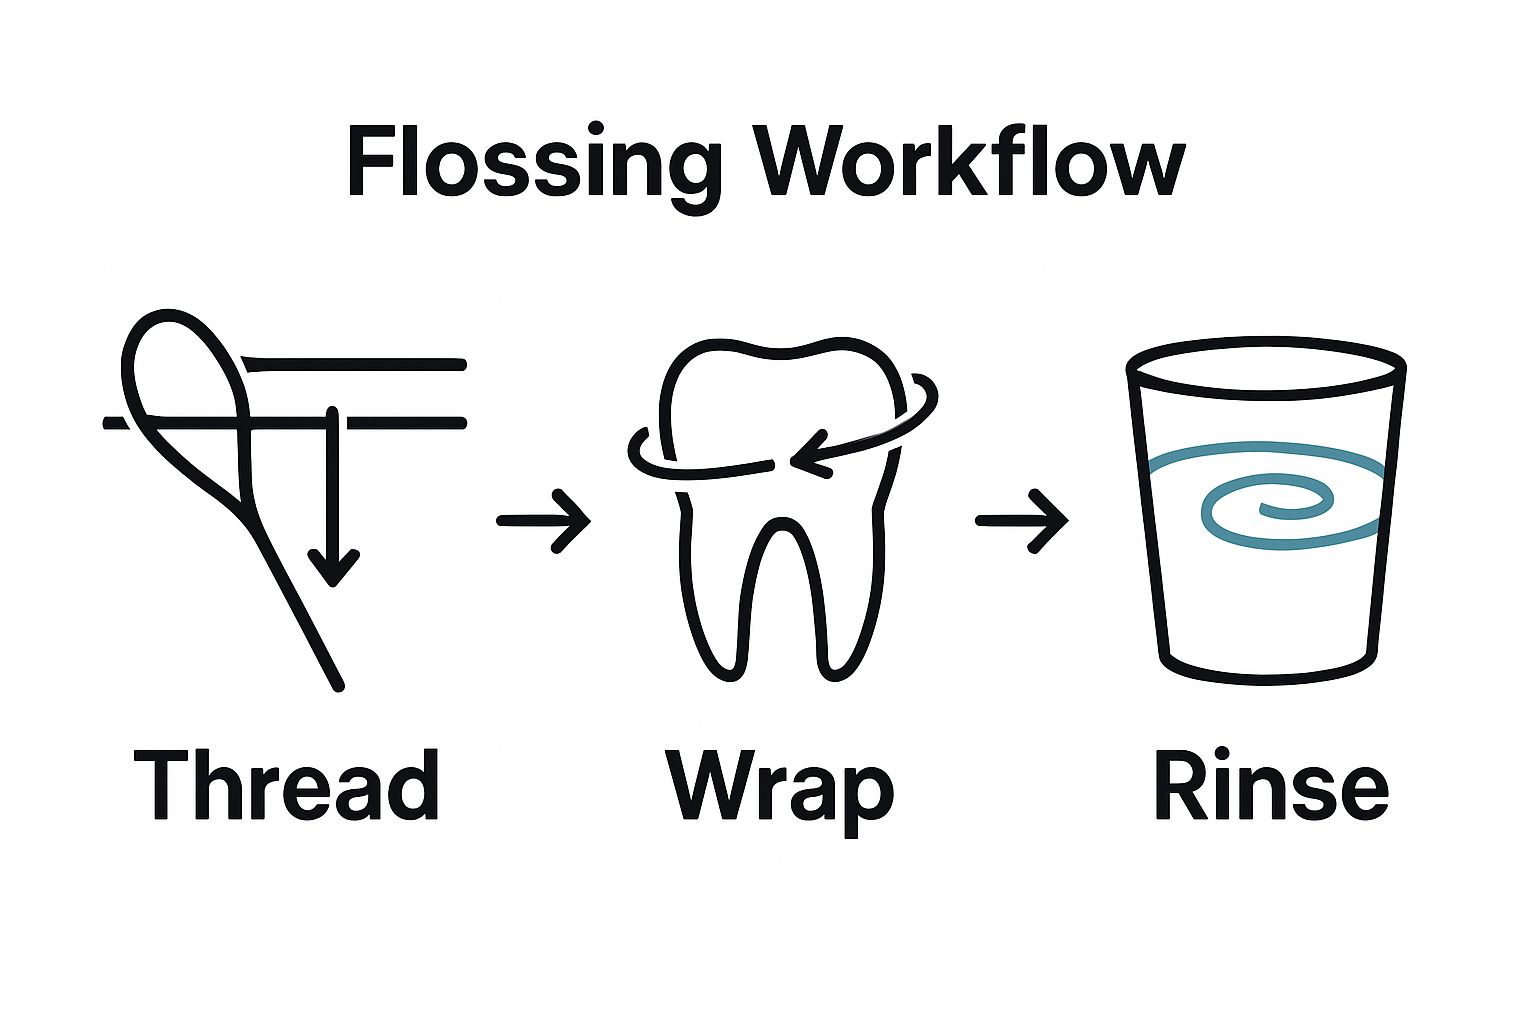
- Step 1: Gather The Necessary Supplies
- Step 2: Prepare Your Floss For Use
- Step 3: Floss Between Your Teeth And Braces
- Step 4: Rinse Your Mouth To Remove Debris
- Step 5: Check For Any Missed Spots
Quick Summary
| Key Point | Explanation |
|---|---|
| 1. Gather specialized flossing tools | Use floss threaders and waxed dental floss to effectively clean around braces without damage. |
| 2. Prepare the floss properly | Create a loop with waxed floss through the threader for easy navigation around orthodontic hardware. |
| 3. Use gentle techniques for flossing | Create a C-shape with floss around each tooth; avoid aggressive movements to prevent damage to braces. |
| 4. Rinse effectively post-flossing | Use an antiseptic mouthwash to dislodge remaining debris and ensure complete cleanliness of braces. |
| 5. Inspect for missed spots | Check for any remaining plaque or food particles using a mirror to maintain optimal oral health. |
Step 1: Gather the necessary supplies
Successfully flossing with braces requires more than just good intentions. Before you start your oral hygiene routine, you will need to assemble specific tools designed to work around orthodontic hardware. Proper preparation makes the entire process smoother and more effective.
For your flossing toolkit, you will want to collect specialized dental hygiene items that can navigate the complex landscape of brackets and wires. The most critical tool is a floss threader, a thin, flexible plastic tool that helps guide traditional floss underneath orthodontic wires. These threaders act like a needle, allowing you to thread floss where standard techniques cannot reach.
You will also want to have waxed dental floss on hand. Unwaxed floss tends to shred and catch on braces, potentially damaging your orthodontic equipment. Waxed floss slides more smoothly between teeth and around brackets, reducing the risk of snagging or breaking. Orthodontic floss is another excellent option, as it is specifically designed with extra stiffness to help navigate around braces.
Additional helpful tools include:
- Water flossers (oral irrigators)
- Interdental brushes
- Floss picks designed for braces
Before beginning, ensure you have a mirror positioned to give you a clear view of your teeth and braces. Good lighting is also crucial, as it helps you see exactly where the floss needs to go. Patience and good lighting are your best friends during this process.
A typical flossing session with braces will take longer than traditional flossing – typically around 5 to 10 minutes. Do not rush. Methodical, careful technique prevents potential damage to your braces and ensures thorough cleaning. Allocate enough time in your daily routine to perform this important oral health task thoroughly and correctly.
By gathering these tools and creating a comfortable, well-lit environment, you set yourself up for successful flossing with braces.
Below is a summary table of recommended flossing tools for braces along with their main purpose and any special considerations.
| Tool | Purpose | Special Considerations |
|---|---|---|
| Floss threader | Guides floss under archwires and around brackets | Thin, flexible, needle-like; must use gently |
| Waxed dental floss | Cleans between teeth without shredding near braces | Slides smoothly; less likely to catch or break |
| Orthodontic floss | Designed for use with braces and hardware | Stiff ends or extra strength; easier to thread |
| Water flosser (oral irrigator) | Flushes out particles around wires and brackets | Helpful but not a replacement for regular floss |
| Interdental brush | Cleans small spaces between brackets and teeth | Use gently; select size appropriate for your gaps |
| Floss picks for braces | Offers pre-threaded, easy flossing around brackets | Choose those specifically engineered for orthodontics |
| Well-lit mirror | Ensures visibility during flossing process | Position for best angle on braces and wires |
| The right preparation transforms what might seem like a challenging task into a manageable part of your daily dental care routine. |
Step 2: Prepare your floss for use
After gathering your supplies, the next critical step in flossing with braces involves preparing your floss for precise and effective cleaning. This preparation stage is crucial because traditional flossing techniques simply will not work with orthodontic hardware. Your goal is to create a setup that allows you to clean between teeth and around brackets without causing damage.
Floss threaders become your primary tool in this preparation process. These thin, flexible plastic guides help you navigate floss underneath the main wire of your braces. To begin, take a length of waxed dental floss approximately 18 inches long. This provides enough length to work comfortably without tangling or running short during the process.
Next, take your floss threader and create a loop at one end by threading approximately 4 to 5 inches of floss through its narrow opening. The loop should be large enough to easily guide the floss where you need it. Imagine the threader as a needle that helps you navigate through the tight spaces created by braces. Gently insert the pointed end of the threader underneath the main archwire, sliding it carefully to avoid catching or bending the wire.
For those who find traditional floss threaders challenging, alternative tools can simplify the process:
- Orthodontic floss with a stiff end
- Pre-threaded dental floss picks designed for braces
- Water flossers with specialized orthodontic tips
As you prepare, maintain a relaxed grip on your tools. Tension can lead to jerky movements that might accidentally damage your braces or hurt your gums. Slow and steady wins the race when it comes to preparing floss for use with orthodontic equipment. If you encounter resistance, do not force the threader. Instead, adjust your angle or try a different approach.
Practice and patience are key.
Your first few attempts might feel awkward, but muscle memory develops quickly. Orthodontic specialists at the American Association of Orthodontists recommend practicing the technique in front of a well-lit mirror, allowing you to see exactly what you are doing.
By the end of this preparation stage, you should have a floss threader loaded with waxed floss, ready to navigate around your braces with precision and care. The next step involves actually threading the floss and beginning the cleaning process.
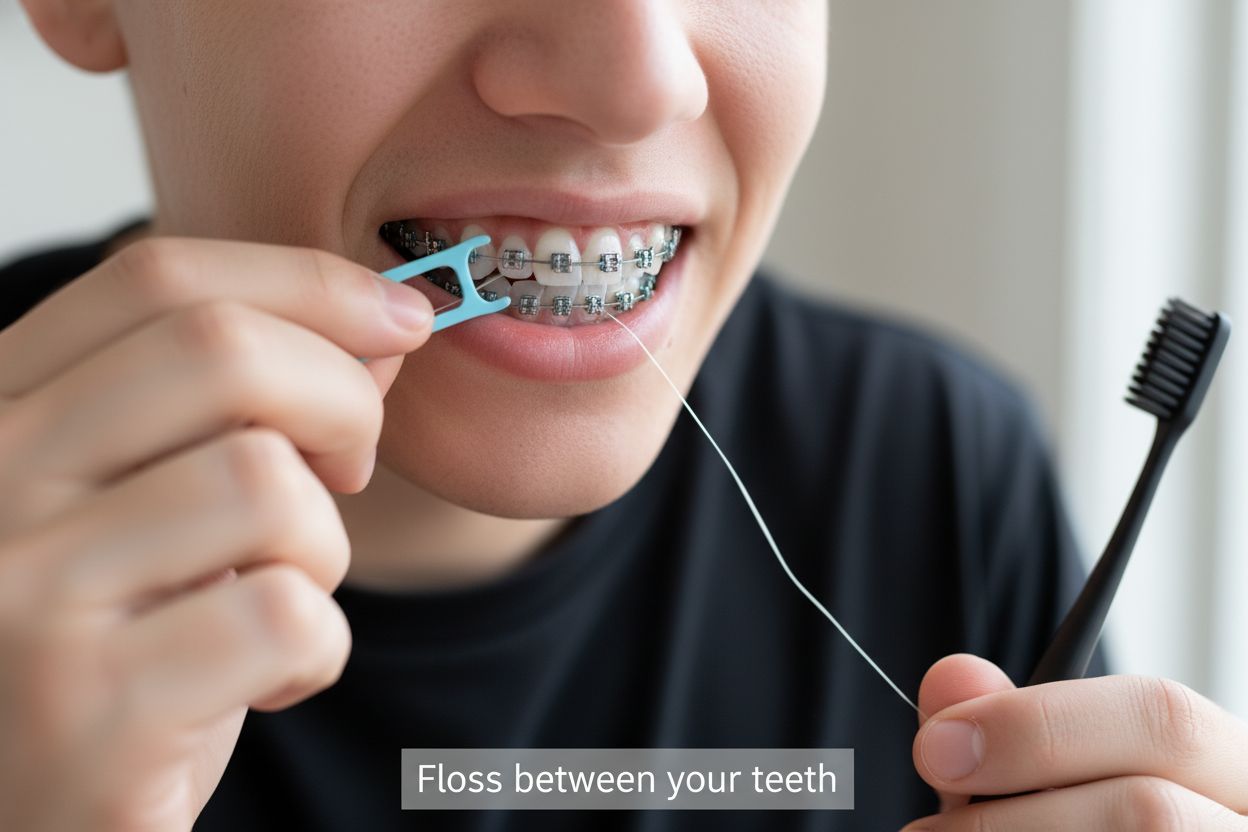
Step 3: Floss between your teeth and braces
With your floss threader prepared, you now enter the most intricate phase of cleaning around braces. Precision and gentle technique are paramount when navigating the complex landscape of brackets, wires, and tooth surfaces. This step requires patience and a methodical approach to ensure thorough cleaning without causing damage to your orthodontic equipment.
Begin by positioning the floss threader with its attached floss underneath the main archwire. Gently guide the threader between two teeth, creating a clear pathway for the floss. Imagine you are creating a small tunnel that allows you to clean those hard-to-reach spaces. Once the floss is positioned, carefully wrap it around one tooth in a C-shape, moving it up and down along the tooth surface. This technique helps remove plaque and food particles that accumulate near the gumline and around bracket edges.
Repeat this process for each tooth, being mindful of the unique challenges presented by braces. Move systematically from one tooth to the next, using a fresh section of floss for each interdental space. Do not reuse the same floss segment, as this can spread bacteria and debris between teeth. If you notice the floss becoming frayed or dirty, replace it immediately.
Some additional strategies to make flossing with braces more effective include:
- Use a gentle sawing motion when moving floss between teeth
- Clean both sides of each tooth thoroughly
- Take extra time around brackets and wire connections
Pay special attention to areas where food tends to accumulate. Brackets create numerous tiny spaces where particles can hide, making thorough cleaning critical. Research from the Journal of Clinical Orthodontics highlights that patients with braces are more susceptible to plaque buildup, making meticulous cleaning essential for preventing dental issues.
As you work, maintain a light touch. Aggressive flossing can bend wires or damage brackets, potentially extending your orthodontic treatment time.
 If you encounter resistance or pain, stop and adjust your technique. Bleeding gums might indicate initial inflammation, but this typically reduces with consistent, gentle cleaning.
By the end of this step, you should have systematically cleaned between each tooth, removing trapped food and plaque around your braces. Your mouth should feel fresh, and your teeth should be free of visible debris. This careful approach protects both your dental health and your orthodontic investment.
Step 4: Rinse your mouth to remove debris
After carefully navigating floss through your braces, rinsing becomes a critical final step in your oral hygiene routine. This process removes any remaining food particles, plaque, and loose debris that might have been dislodged during flossing. A thorough rinse ensures complete cleaning and helps maintain overall dental health.
Begin by selecting an appropriate rinsing solution. While water can work, an antiseptic or fluoride mouthwash provides additional benefits. Choose an alcohol-free mouthwash specifically designed for orthodontic patients, as these tend to be gentler and less likely to cause irritation around brackets and wires. Take approximately 20 milliliters of mouthwash – roughly enough to fill a small medicine cup.
Technique matters significantly during this rinsing process. Start by taking the mouthwash into your mouth and swish vigorously, ensuring the liquid moves around all areas of your mouth. Pay special attention to creating movement around your braces, allowing the liquid to flow between brackets and wires. This helps dislodge any remaining particles that might have been missed during flossing.
Consider these additional rinsing strategies:
- Tilt your head slightly forward while swishing
- Use circular mouth movements to maximize coverage
- Spend at least 30 seconds actively rinsing
After swishing, expel the mouthwash completely. Do not swallow. The goal is mechanical removal of debris, not ingestion. If you are using a fluoride mouthwash, avoid eating or drinking for 30 minutes after rinsing to maximize the protective benefits.
The UK National Health Service recommends following a consistent oral hygiene routine that includes thorough rinsing. This helps prevent bacterial buildup and supports long-term dental health, especially when wearing braces.
Finish by examining your mouth in the mirror. Your teeth should look clean, with no visible food particles around brackets or between teeth. A successful rinse leaves your mouth feeling fresh and your braces looking bright. If you notice any remaining debris, repeat the rinsing process or use an interdental brush for targeted cleaning.
Remember that rinsing is not just about immediate cleanliness. It is a preventative measure that protects your teeth, braces, and overall oral health during your orthodontic journey.
Step 5: Check for any missed spots
After completing your initial flossing routine, a meticulous final inspection becomes crucial to ensure comprehensive cleaning around your braces. This verification step transforms good oral hygiene into excellent dental care, catching any overlooked food particles or plaque that might have escaped your previous efforts.
Position yourself in front of a well-lit mirror, preferably with bright, natural lighting that reveals even the smallest details. Tilt your head at different angles to examine every bracket, wire, and tooth surface. Use a small handheld mirror if needed to view hard-to-see areas, especially those toward the back of your mouth. Your goal is to become a dental detective, identifying any remaining debris or potential problem areas.
Carefully inspect each individual bracket and the spaces between teeth. Look for white, yellow, or dark spots that might indicate trapped food or early plaque formation. Pay special attention to areas around metal wires and bracket connections, where particles tend to accumulate most frequently. If you notice any remaining debris, do not panic. Simply take your floss threader or an interdental brush and target those specific locations for additional cleaning.
Consider these verification strategies:
- Use good lighting and multiple mirror angles
- Run your tongue along teeth to feel for rough or sticky areas
- Take your time during the inspection process
If you have difficulty seeing certain areas, consider using a small dental mirror or even taking a well-lit selfie to examine your teeth from different perspectives. Some patients find it helpful to use a small flashlight to illuminate hard-to-see spots, providing additional clarity during the inspection process.
Dental professionals at the American Dental Association recommend treating this final check as an essential component of your oral hygiene routine. A thorough review can help prevent potential issues like tooth decay, gum inflammation, and other complications associated with inadequate cleaning around orthodontic hardware.
Consistency is key in this verification process. The more frequently you perform a detailed check, the more comfortable and efficient you will become at identifying and addressing potential problem areas. Over time, this step will become second nature, allowing you to maintain optimal oral health throughout your orthodontic treatment.
A successful inspection leaves you feeling confident that your teeth are clean, your braces are clear of debris, and your oral hygiene routine is complete.
The following checklist table can help you verify that your flossing and cleaning routine with braces is thorough and complete every time.
| Task | How to Verify | Tools/Actions to Use |
|---|---|---|
| Flossed between every tooth | Floss moved smoothly, no resistance | Floss threader, waxed floss |
| Cleaned around all brackets and wires | No visible plaque or food remains | Mirror, floss, interdental brush |
| Rinsed thoroughly after flossing | Mouth feels clean, no loose debris | Mouthwash or water |
| Inspected teeth and braces in mirror | No white, yellow, or dark spots | Well-lit mirror, flashlight |
| Used fresh floss for each tooth gap | Floss not frayed or dirty | Multiple sections of floss |
| Addressed any missed or stubborn debris | No rough or sticky areas left | Interdental brush, re-flossing |
| If you have any persistent concerns or difficulties, do not hesitate to consult your orthodontist for personalized guidance. |
Struggling to Keep Your Braces Clean? Get Expert Help in Langley
If you find flossing with braces frustrating or time-consuming, you are not alone. Many people with orthodontic appliances face challenges like reaching tricky spots around wires and brackets, dealing with unwanted plaque buildup, and worrying about damaging their braces during daily cleaning. The good news is that professional support tailored to your unique needs can make all the difference.

At Glow Orthodontics, our caring team specializes in making your orthodontic journey easier. We provide hands-on instruction for techniques like using a floss threader and waxed floss, and offer personalized recommendations for keeping your braces sparkling clean. Schedule a consultation today through our easy online booking system and take the stress out of your oral hygiene routine. If you want practical tips or have questions about your treatment, our friendly office is here for you right now. Don’t wait for plaque or discomfort to become a problem—let us help you enjoy a confident, healthy smile throughout your braces experience.
Frequently Asked Questions
How do I prepare my floss for use with braces?
To prepare your floss for use with braces, take a length of waxed dental floss about 18 inches long and create a loop at one end using a floss threader. Gently insert the threader under the main archwire to help guide the floss between your teeth.
What is the best technique for flossing between teeth and braces?
The best technique is to gently guide the floss threader under the archwire, wrap the floss into a C-shape around the tooth, and move it up and down to clean thoroughly. Repeat this process for each tooth, ensuring to use a fresh section of floss for each space to avoid spreading bacteria.
How long should I spend flossing my braces each day?
You should spend about 5 to 10 minutes flossing your braces each day to ensure thorough cleaning around teeth and brackets. Schedule this time into your daily oral hygiene routine to avoid rushing through the process.
What should I do if I notice bleeding gums while flossing?
If you notice bleeding gums while flossing, it may indicate inflammation due to inadequate cleaning or aggressive technique. Adjust your technique to be more gentle, and if bleeding persists for more than a week, consult your orthodontist for advice.
Why is rinsing my mouth important after flossing with braces?
Rinsing your mouth after flossing is essential to remove any dislodged food particles and plaque. Use an alcohol-free mouthwash and swish for at least 30 seconds to maximize cleanliness and protect your oral health.
How can I check for missed spots after flossing?
After flossing, use a well-lit mirror to inspect each tooth and bracket for any remaining food particles or plaque. Tilt your head at different angles and feel around with your tongue to ensure your teeth are thoroughly clean.